If you rely side-loadable jailbreak tools such asChimera,Electra, orunc0ver, then it’s important to understand the plethora of ways you can install them on your iPhone or iPad. While methods such asAltStore,Cydia Impactor, and third-party signing services likeIgnitionandiOS Ninjaare some of the most popular, many tend to forget that you can use Apple’s own Xcode development platform on the Mac to accomplish this task.
TheXcodemethod came in clutch for me countless timeswhen Cydia Impactor stopped working for an extended periodand when all the best signing services had been revoked; to make matters worse, my handset’s iOS version was too old to run AltStore. With that in mind, we’ll be sharing the Xcode method in this tutorial for fellow jailbreakers that find themselves in similar predicaments down the road.

What you’ll need
Using Xcode to side-load your jailbreak can be a great deal more convoluted and time-consuming than using the easier methods above, but it also tends to be a lot more reliable. To make this work, you’ll need the following things:
We’ll be using the unc0ver jailbreak throughout this tutorial because it’s the newest jailbreak available, but if you prefer, you may also use this method to side-load Chimera for iOS 12 or Electra for iOS 11.

After you’ve gathered what you need, you can move on to the next section of this tutorial to begin installing your jailbreak. Please be advised, there are a lot of steps.
Installing a side-loadable jailbreak app with Xcode
When you’re ready to install your side-loadable jailbreak app with Xcode, then follow these steps:
1)Launch Xcode and click theCreate a new Xcode projectbutton in the startup window:

2)Make sureSingle View Appis selected in the next window, then click on the blueNextbutton:
- Enter a Product Name, Organization Name, and Organization Identifierof your choosing, then click on the blueNextbutton. In our example, we call the project “unc0ver” and use “iDownloadBlog” as the Organization and Identifier, but you should use something more original:

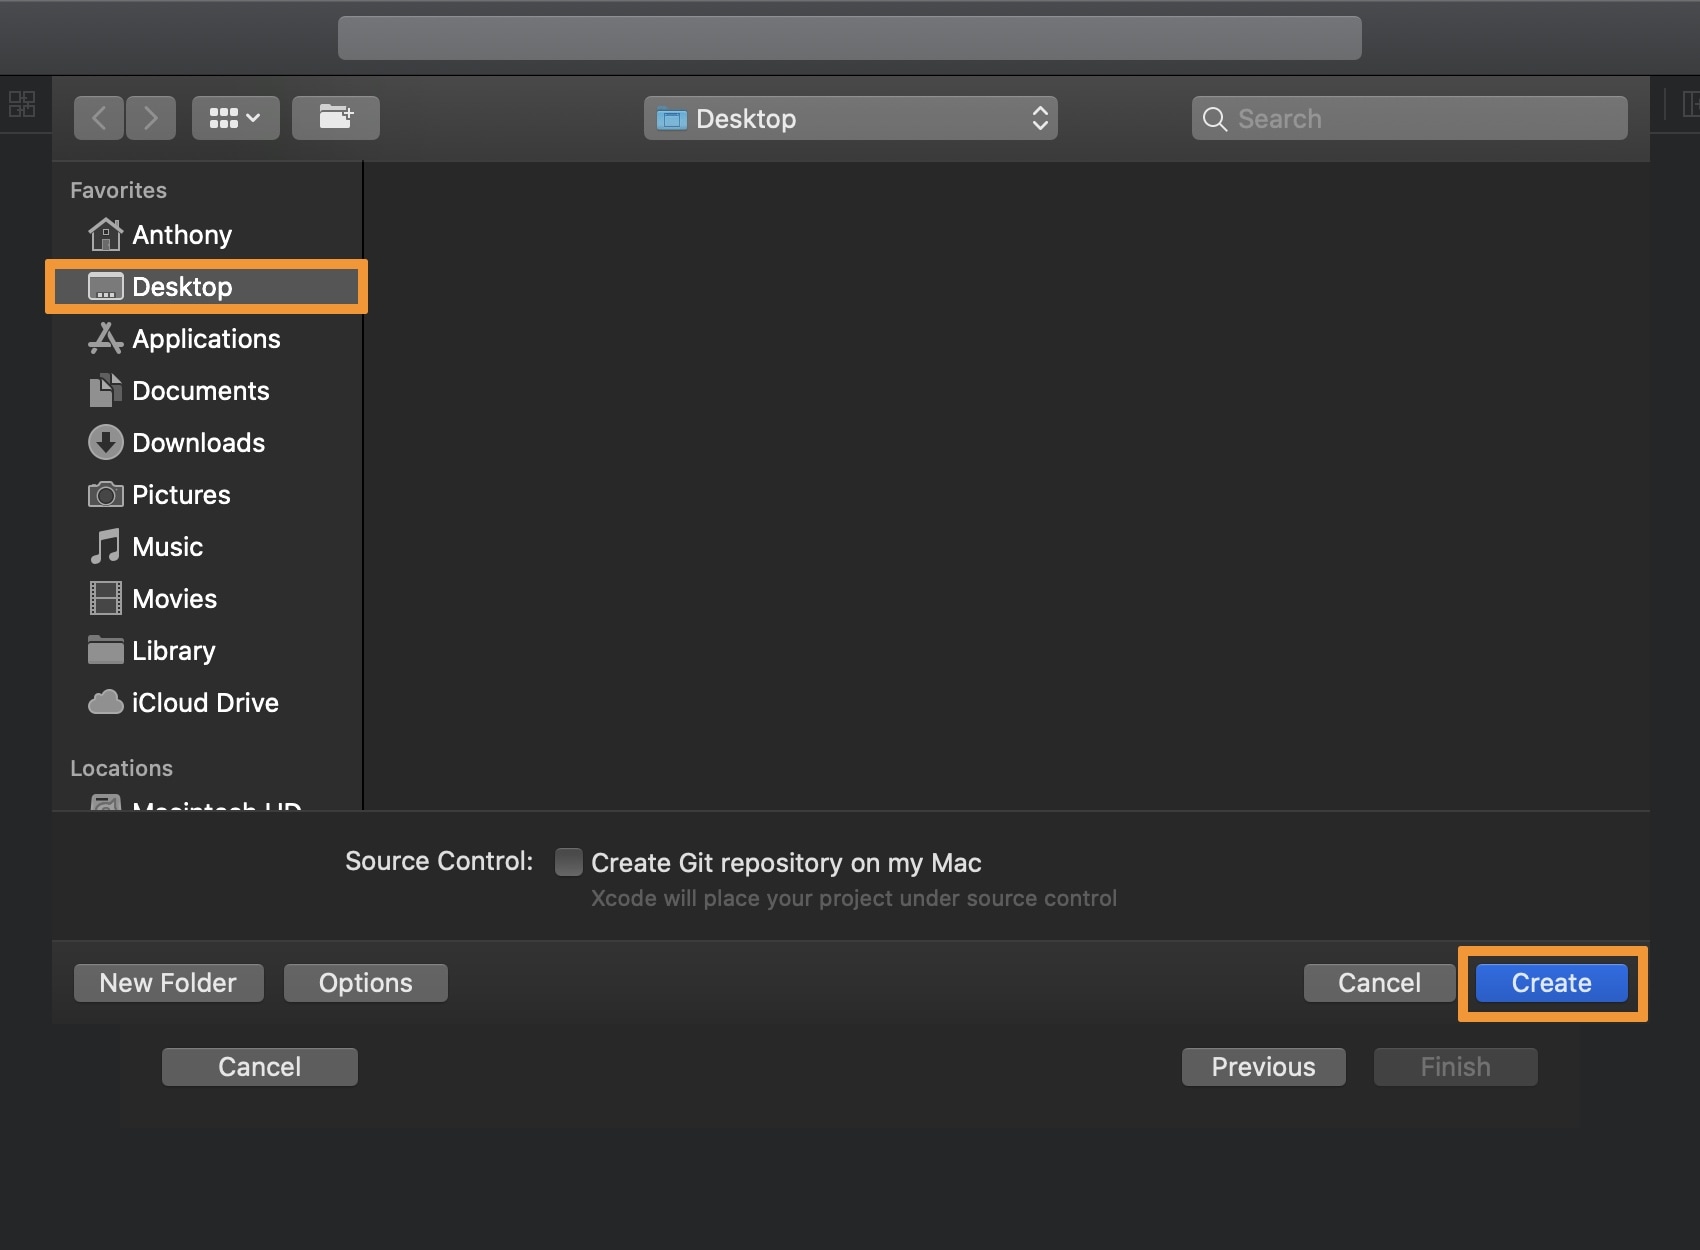
4)In the next Window, choose yourDesktopas the place to save files to, then click on the blueCreatebutton:
5)Plug your jailbreakable iPhone or iPad into your Mac with a MFi-certifiedLightningto USB cable and Trust it from both the device and your Mac if prompted.
6)At the top-left of the Xcode window,click on the drop-down menuandselect your connected device:
7)Next,click on the item at the top of the project treewith the blue development icon (ours is called unc0ver), then clickSigning & Capabilities:
8)Click in theTeamsdrop-down menu andadd a new team or choose an existing team. In our case, we picked an existing one:
Note:If you don’t have a team yet, then Xcode may prompt you to sign in with anApple IDassociated with a free developer account. Follow the prompts to do so, then select it from the Team drop-down menu and move on to the next step.
9)Next, you’ll need to do a quick check to verify you have all the tools you need. LaunchTerminalandenter the following command:
Note: If you get the error stating “error: command line tools are already installed, use “Software Update” to install updates,” then you’re good to go and can move on to the next step. Otherwise, follow the instructions and save any certificates you’re prompted to save before moving on.
10)Launch the iOS App Signer appthat you downloaded earlier:
11)Click theBrowsebutton andselect the jailbreak app .IPA file you downloaded. In this case, we’re using the unc0ver app we downloaded fromunc0ver.dev.
12)Setyour Apple ID as the Signing Certificate, select your app identifier for the Provisioning Profile, and enter an App Display Name and App Version. Once finished, click on theStartbutton.
Note: Do not leave the Provisioning Profile field on Re-Sign. This does nothing and it won’t work.
13)You will now be prompted to save your signed .IPA file somewhere. Choose yourDesktopand click the blueSavebutton:
Note: A signed .IPA file will be saved to your Desktop. We will now use Xcode to side-load this app to your iPhone or iPad for jailbreak deployment.
14)Now, go back to Xcode and navigate toWindow -> Devices and Simulators:
15)In the new window, make sure that your iPhone is selected in the sidebar on the left, and then click on the+button near the bottom of the window:
16)A new window appears, go to yourDesktopandselect the signed .IPA fileyou created earlier, then click on the blueOpenbutton:
Note: Xcode will now install the custom .IPA on your iPhone or iPad. When complete, the app should appear in the Installed Apps list, like so:
17)Once installed, go toSettings → General → Device Managementon your iPhone or iPad and tap on the Apple Development Apple ID option:
18)Next, tap on theblueTrustbutton, and then tap on theredTrustbutton inside the popup that appears:
Note: The jailbreak app is now installed and trusted, and you’re now free to launch and use it.
19)Return to the Home screen andlaunchthe newly-installed jailbreak app:
20)Tap on theJailbreakbutton:
Once finished, you are officially jailbroken and can install add-ons andjailbreak tweaksfrom the pre-installed package manager.
Conclusion
The Xcode method isn’t as fast or convenient as the other methods for installing side-loadable jailbreaks, but it hasn’t let me down yet. In the event that Cydia Impactor stops working again, or any of the signing services stop working, it’s a great backup method to get you up and running again. It can also help familiarize you with the Xcode interface if you’ve never used Apple’s development tools before.
Were you able to get your jailbreak running again with Xcode? Share your experience in the comments section below.
